Developer Offer
Try ImaginePro API with 50 Free Credits
Build and ship AI-powered visuals with Midjourney, Flux, and more — free credits refresh every month.
The Ultimate Guide to FLUX 3 - Updated Guide
The Ultimate Guide to FLUX 3 - Updated Guide

Understanding FLUX 3 AI Image Model
What Is FLUX 3 and Why It Matters
FLUX 3 is the latest evolution in the FLUX family of AI image models from Black Forest Labs. Unlike earlier image generators that often required heavy prompt tuning, FLUX 3 is designed to turn natural-language descriptions into high-resolution images with strong compositional coherence and typography handling. For developers and creators who have become accustomed to the limitations of diffusion models, the FLUX 3 AI image model marks a shift toward more reliable, production-ready output.
Why does it matter? Because AI image generation has moved from novelty to pipeline status. Teams now use these tools for concept art, marketing visuals, prototyping, and even architecture previsualization. The FLUX 3 AI image model stands out because it combines high-resolution output with the kind of prompt fidelity that reduces iteration cycles. In practice, that means fewer "no, I meant this" moments and more time spent refining ideas rather than fighting the model. For teams that want immediate results without setting up infrastructure, managed platforms like Imagine Pro offer a compelling alternative. Imagine Pro is an AI-powered image generation tool that creates stunning, high-resolution images in seconds, which makes it especially useful for non-technical collaborators who need to iterate quickly.
Key FLUX 3 Features That Stand Out
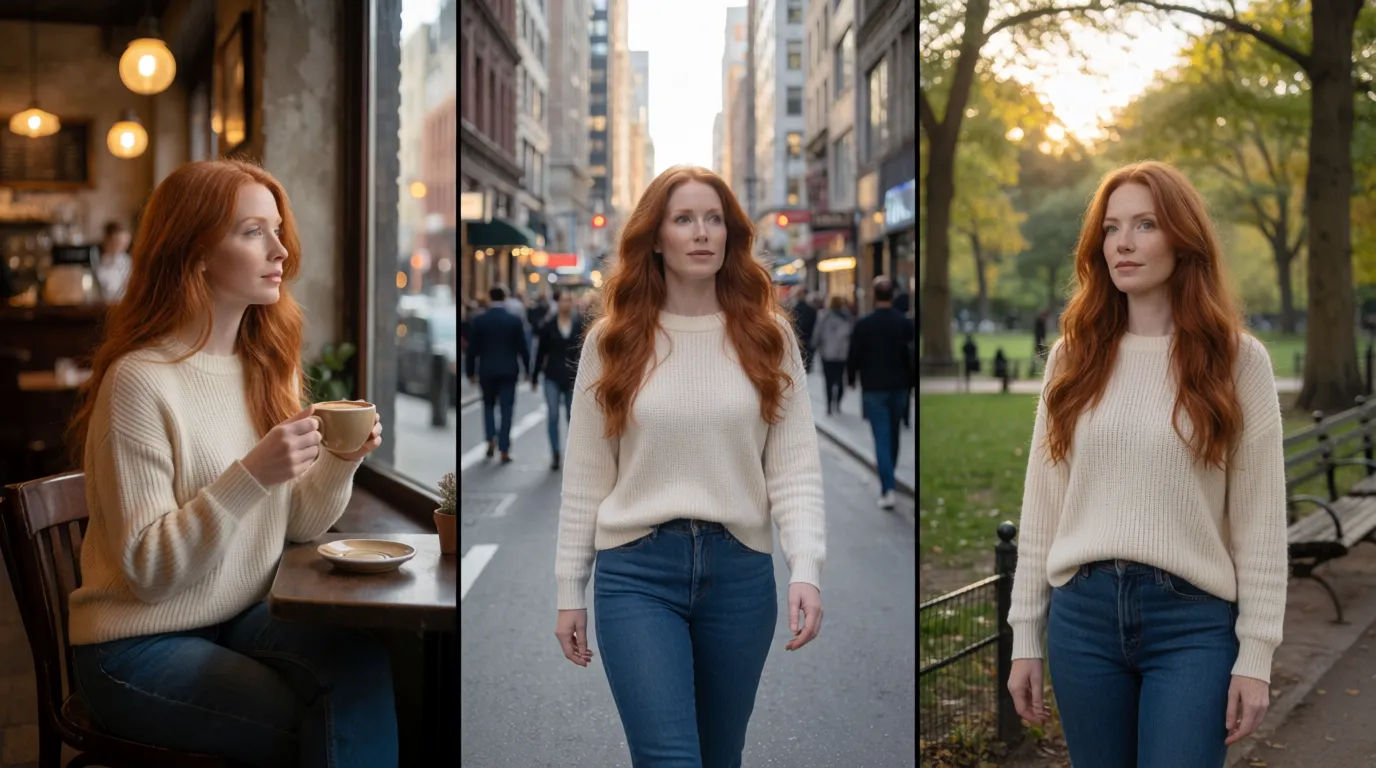
The FLUX 3 features that have generated the most buzz are:
- Resolution: native generation at high resolutions without the softness that plagued earlier models.
- Rendering speed: significantly faster than previous FLUX versions, especially on modern GPUs.
- Prompt fidelity: better understanding of long, multi-part prompts, including positional relationships.
- Stylistic range: supports photorealism, illustration, 3D render, anime, oil painting, and more.
- Control: more predictable behavior with negative prompts, seeds, and structural guidance.
Taken together, these FLUX 3 features make the model useful for both beginners and advanced users. You can create a simple portrait in minutes, but you can also dial into specific lighting and composition with a level of control that was previously reserved for bespoke pipelines. That flexibility is why so many technical users are drawn to FLUX 3, even when easier tools exist.
How the FLUX 3 AI Image Model Works Under the Hood

At its core, FLUX 3 is a diffusion model. It starts with pure noise and iteratively refines that noise into an image, guided by an encoded text prompt. The text encoder converts your prompt into a semantic representation, and the diffusion process uses that representation to steer every denoising step.
What makes FLUX 3 different from older architectures is the use of transformer-based diffusion blocks and flow-matching training. Instead of learning a fixed forward process, flow-matching learns to interpolate between noise and image over continuous time. This results in better mathematical stability during training and faster sampling at inference. The practical implication is that the FLUX 3 AI image model produces fewer artifacts and handles detail-heavy prompts more gracefully.
For the average user, you don't need to know the math. But understanding the diffusion process helps with prompt design. Because the model builds the image from coarse shapes to fine details, early-stage noise dominates composition, while later stages affect texture and facial features. That is why small changes to a seed can produce large changes in composition, while larger changes to the prompt mostly affect conceptual content.
FLUX 3 vs Imagine Pro: The Ultimate Comparison
Feature-by-Feature Breakdown

Let's compare FLUX 3 with Imagine Pro, an AI-powered image generation tool that creates stunning, high-resolution images in seconds. Imagine Pro is designed for speed and accessibility, while FLUX 3 offers maximum control for users who want to manage their own pipelines. The table below summarizes the main differences.
| Feature | FLUX 3 AI image model | Imagine Pro |
|---|---|---|
| Output quality | Excellent, especially in expert hands | Excellent, tuned for out-of-box results |
| Generation speed | Fast on GPUs; depends on hardware | Fast; optimized for immediate delivery |
| Resolution | High, with configurable output | High, with preset options |
| Style flexibility | Very high; supports custom checkpoints | High; curated styles and presets |
| Ease of use | Requires setup and technical understanding | Simple, no technical configuration needed |
| Prompt control | Deep; seeds, negatives, CFG, schedulers | Friendly; handles detailed prompts well |
| API / integration | Flexible but requires hosting/API management | Ready-to-use platform with API options |
| Free trial | Varies by provider | Yes, Imagine Pro offers a free trial |
Both tools can generate outstanding images, but the right choice depends on your workflow. If you are already running a GPU cluster and want fine-grained control, FLUX 3 is a natural fit. If you want fast, polished results without fiddling with model weights, Imagine Pro is the sensible alternative.
FLUX 3 vs Imagine Pro: Which One Is Faster for Real Projects?
In real projects, speed is not just about inference time. It is about the full loop: prompt drafting, generation, review, retry, and final export. FLUX 3 inference can be extremely fast—sub-second per image on powerful hardware—but the human-in-the-loop overhead can slow things down if you need to tweak parameters, manage dependencies, or troubleshoot environment issues.
Imagine Pro is built to minimize that overhead. Because it is a managed service, you can focus on the creative decisions instead of the technology. When I run iterative design sessions for marketing campaigns, I often start with Imagine Pro to generate a broad set of directions quickly. Then I move to more specialized tools like FLUX 3 when a specific style needs to be locked down at the source. The best part: Imagine Pro's free trial makes it easy to evaluate whether its speed and quality meet your bar without any upfront commitment.
Pricing, Accessibility, and Free Trial Options
Pricing models differ significantly. FLUX 3 is open-source-licensed depending on the version, but running it yourself requires investment in compute. Cloud providers offer managed endpoints, but you pay per image or per hour. There is no single free tier across all hosting providers.
Imagine Pro, on the other hand, is a product with a clear subscription model. It gives you immediate access from the first sign-up, and the free trial is a practical entry point for new users. You can test prompt quality, evaluate rendering speed, and compare outputs without needing to provision infrastructure. For an individual developer or a small team, that low-risk access often outweighs the flexibility of self-hosting.
The Practical FLUX 3 Guide: Step-by-Step Tutorial

Setting Up Your FLUX 3 Workspace
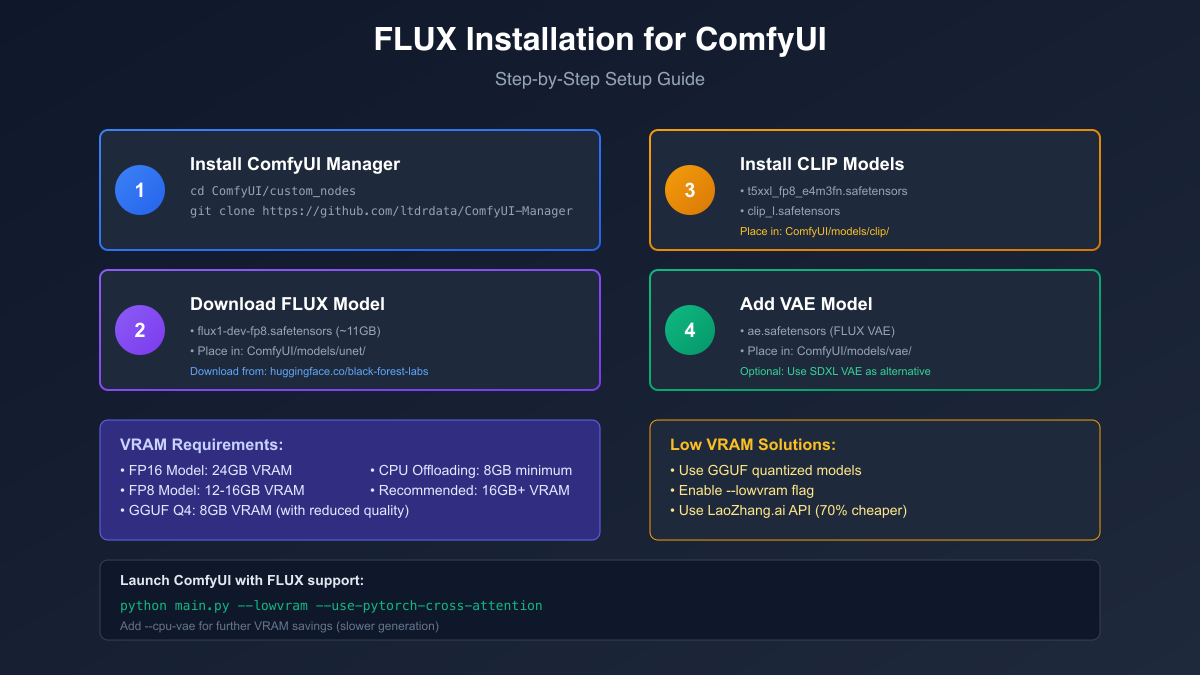
The first hands-on step in this FLUX 3 guide is getting an environment ready. If you are using a cloud platform, create an account, spin up a GPU instance with at least 16 GB of VRAM, and install the FLUX inference library. If you are using a managed service, select the FLUX 3 model variant and note the API endpoint.
Once your environment is ready, download the model weights. The exact command depends on your platform, but most setups follow a pattern: authenticate with the model hub, pull the weights, and load the model into memory. Don't skip the documentation for your chosen provider, because memory requirements and quantization options vary.
Creating Your First FLUX 3 Image
Let's generate a simple image. A good beginner prompt is:
a small wooden cabin in a snowy forest at dusk, warm lights in the windows, cinematic lighting
Set the resolution to 1024x1024, the step count to 28, and the guidance scale to 4.0. Generate. The result should be a coherent, atmospheric image with no obvious artifacts. This is your quick win.
When I teach this to new users, I always emphasize one thing: the default parameters are usually fine. Don't change ten settings at once. Start with a single prompt, evaluate the output, and then adjust one variable at a time.
Writing Effective Prompts for FLUX 3
Prompt structure matters more than raw word count. A useful mental model is: subject, style, lighting, composition, camera angle, and mood. Here is a before-and-after example.
Weak prompt: a woman with red hair
Strong prompt: close-up portrait of a woman with bright red hair, soft window light from the left, shallow depth of field, realistic skin texture, neutral gray background, calm expression, shot on 85mm lens
The strong prompt works because it gives the diffusion model specific anchors. It doesn't just say "portrait"; it tells the model about the lens, the lighting, and the mood. This is where the FLUX 3 AI image model shines: when you provide enough detail, it reproduces your mental picture with surprising accuracy.
Refining the FLUX 3 AI Image Model Output
Refining is where you take control. Negative prompts are the quickest way to eliminate common problems. For portraits, a useful negative prompt is:
bokeh, oversaturated, deformed hands, extra fingers, blurry
Seed control lets you reproduce a base composition while changing one detail. For example, if you like a portrait but want a different facial expression, change a few prompt words and keep the same seed. Upscaling is another key step. Most models output at 1024 or 2048 by default; using a dedicated upscaler tool will preserve details at larger sizes.
Finally, iteration is non-negotiable. The first generation is rarely the last. In production workflows, I typically generate four to eight variants and then refine the best one. This is why speed matters: faster iteration means you can explore more options without wasting time.
Real-World FLUX 3 Examples and Use Cases
Example 1: Photorealistic Portraits
Prompt:
photorealistic portrait of a scientist in her fifties, gray hair tied back, lab coat, soft studio lighting, neutral background, high detail eyes, natural skin texture, full head and shoulders
Why this works: the prompt specifies a realistic style, the subject's age, clothing, lighting, and composition. FLUX 3 renders skin texture and facial details without the waxy look common in older models. If you want more pronounced skin texture, add fine pores, subtle peach fuzz to the positive prompt and smooth skin to the negative prompt.
Example 2: Fantasy Concept Art
Prompt:
fantasy concept art of a giant floating castle above a moonlit valley, glowing purple crystals, two moons, epic composition, painterly style, soft fog, distant waterfalls
Maintaining visual consistency across multiple images is tricky. One technique is to repeat a fixed set of style anchors at the end of every prompt: painterly, detailed, cinematic lighting, high resolution. FLUX 3 will learn to associate those anchors with a consistent look, making it easier to create a cohesive series.
Example 3: Product and Marketing Visuals
Prompt:
elegant product shot of a black wireless headphone on a polished marble surface, soft gradient background, dramatic rim light, commercial photography, hyper-realistic
For commercial work, brand-safe assets matter. If you need variations quickly, Imagine Pro is a strong alternative for rapid iteration. Its preset styles are designed to produce polished marketing visuals in seconds, and the free trial lets you test whether it matches your brand guidelines before committing.
Example 4: Architectural Visualization
Prompt:
modern villa exterior at twilight, floor-to-ceiling windows, warm interior lighting, reflecting pool, minimalist landscape, photorealistic 3D render
FLUX 3 handles both interior and exterior renderings well. To improve realism, include specific material details in the prompt: brushed concrete, oak wood slats, glass railing. Also specify the perspective: wide-angle lens, eye-level view, symmetrical composition. This gives the model enough information to produce a convincing architectural image.
Advanced FLUX 3 Techniques and Hidden Insights
Prompt Engineering for Consistent Style
Once you understand basic prompts, you can move to advanced formulas. A common pattern is: subject + action + environment + style anchor + technical detail + mood.
Here is an example with a style anchor:
a robot gardener tending flowers, rooftop greenhouse at sunrise, style anchor: volumetric lighting, delicate film grain, muted color palette, shallow depth of field
Using the same style anchor across prompts creates brand consistency. Descriptive repetition tells the model what to prioritize. You can also experiment with weighted terms if your platform supports them, such as (detailed face:1.2) to emphasize facial features.
Using Custom Checkpoints and Control Tools
FLUX 3's open architecture supports custom checkpoints and fine-tuning approaches similar to LoRA. This is a huge advantage for teams that need a very specific style or subject. You can train a lightweight adapter on your own product images or art style, then use it with base FLUX 3.
However, this setup requires technical configuration. If you need speed without the setup, Imagine Pro is an easier no-setup alternative. It abstracts away checkpoints, schedulers, and accelerators, letting you focus on the final image. For many creative teams, that trade-off is worth it.
Performance Benchmarks: Speed, Resolution, and Detail
Exact benchmarks depend on your hardware, but here are expectations for a modern data-center GPU:
- Inference time: 1–3 seconds for a 1024x1024 image at 28 steps.
- Memory use: 12–24 GB depending on precision and sequence length.
- Output size: up to 2K with native support, higher with upscaling.
In practice, the bottleneck is often memory rather than compute. Use half-precision or quantized weights to reduce memory usage on smaller GPUs. This may slightly affect quality, but the difference is usually negligible for preliminary drafts.
Hidden Insight: Avoiding Common Artifacts
The most common FLUX 3 artifacts are distorted hands, garbled text, and unnatural lighting. Here's how to avoid them:
- Hands: add
correct hand anatomyto the positive prompt anddeformed hands, extra fingers, missing fingersto the negative prompt. For critical shots, generate several variants and pick the best one. - Text: FLUX 3 handles short text well, but for longer phrases use quotation marks and specify spelling if needed.
- Lighting: avoid contradictory lighting terms. Don't say
studio lightingandsunlight from two different anglesin the same prompt. Choose one dominant light source and describe its direction.
These insider tips will save you hours of frustration.
Common FLUX 3 Mistakes and How to Avoid Them
Why the FLUX 3 AI Image Model Sometimes Fails
Even the best model fails. Common failure modes include anatomical issues, over-saturation, prompt misinterpretation, and noise artifacts. Over-saturation often happens when you combine too many color-related words. Prompt misinterpretation occurs when the prompt is ambiguous about spatial relationships. Noise artifacts may appear when using too few diffusion steps.
Troubleshooting Workflow and Retry Strategies
When a generation fails, follow these steps:
- Read the image and identify the exact problem.
- Modify the prompt to address that issue only.
- If the problem persists, change the seed.
- Adjust the negative prompt.
- Increase resolution or switch to a different sampler.
- As a last resort, use a stronger prompt structure.
I have found that a structured retry strategy reduces wasted iterations. Instead of randomly changing everything, make one change at a time and compare outputs.
Lessons from Production Use
In production settings, teams learn that consistent quality requires a curation step. You cannot blindly automate image generation without a human reviewer. Marketing teams often use FLUX 3 for initial concepts, then use Imagine Pro for final brand-safe assets. The lesson is to combine the strengths of both tools: FLUX 3's control with Imagine Pro's speed and polish.
Expert Recommendations and Industry Best Practices
What the Experts Say About FLUX 3
The consensus among professional AI artists is that FLUX 3 is a major step forward in prompt adherence and image coherence. Its main limitation is that it still requires prompt experience to get the best result. Experts recommend investing time in prompt crafting and learning how to use negative prompts and seed control.
When to Use FLUX 3 vs Imagine Pro
Use FLUX 3 when:
- You need fine-grained control over the generation process.
- You have the infrastructure to run the model.
- You require custom fine-tuning or checkpoints.
Use Imagine Pro when:
- You need images fast without setup.
- You want a simple interface for non-technical team members.
- You're evaluating quality before making a larger investment.
Imagine Pro's free trial makes it easy to compare its speed and quality with FLUX 3 outputs in your own workflow.
Pros and Cons at a Glance
FLUX 3 AI image model
- Pros: high-quality output, deep control, open customization options.
- Cons: steeper learning curve, hardware requirements, more setup.
Imagine Pro
- Pros: fast, accessible, polished output, free trial.
- Cons: less granular control, less open for custom model training.
Conclusion
FLUX 3 is a powerful AI image model that rewards users who are willing to learn its strengths and limitations. From high-resolution output and strong prompt fidelity to the ability to fine-tune with custom checkpoints, it has become a valuable tool for creators and developers. At the same time, Imagine Pro offers a faster, more approachable path to high-resolution images, especially for teams that want results without technical complexity. The best approach is not to choose one exclusively, but to understand both tools and decide based on your project's needs. If you haven't tried Imagine Pro yet, its free trial is the perfect low-risk way to see what it can do alongside the FLUX 3 AI image model.
Compare Plans & Pricing
Find the plan that matches your workload and unlock full access to ImaginePro.
| Plan | Price | Highlights |
|---|---|---|
| Standard | $8 / month |
|
| Premium | $20 / month |
|
Need custom terms? Talk to us to tailor credits, rate limits, or deployment options.
View All Pricing Details